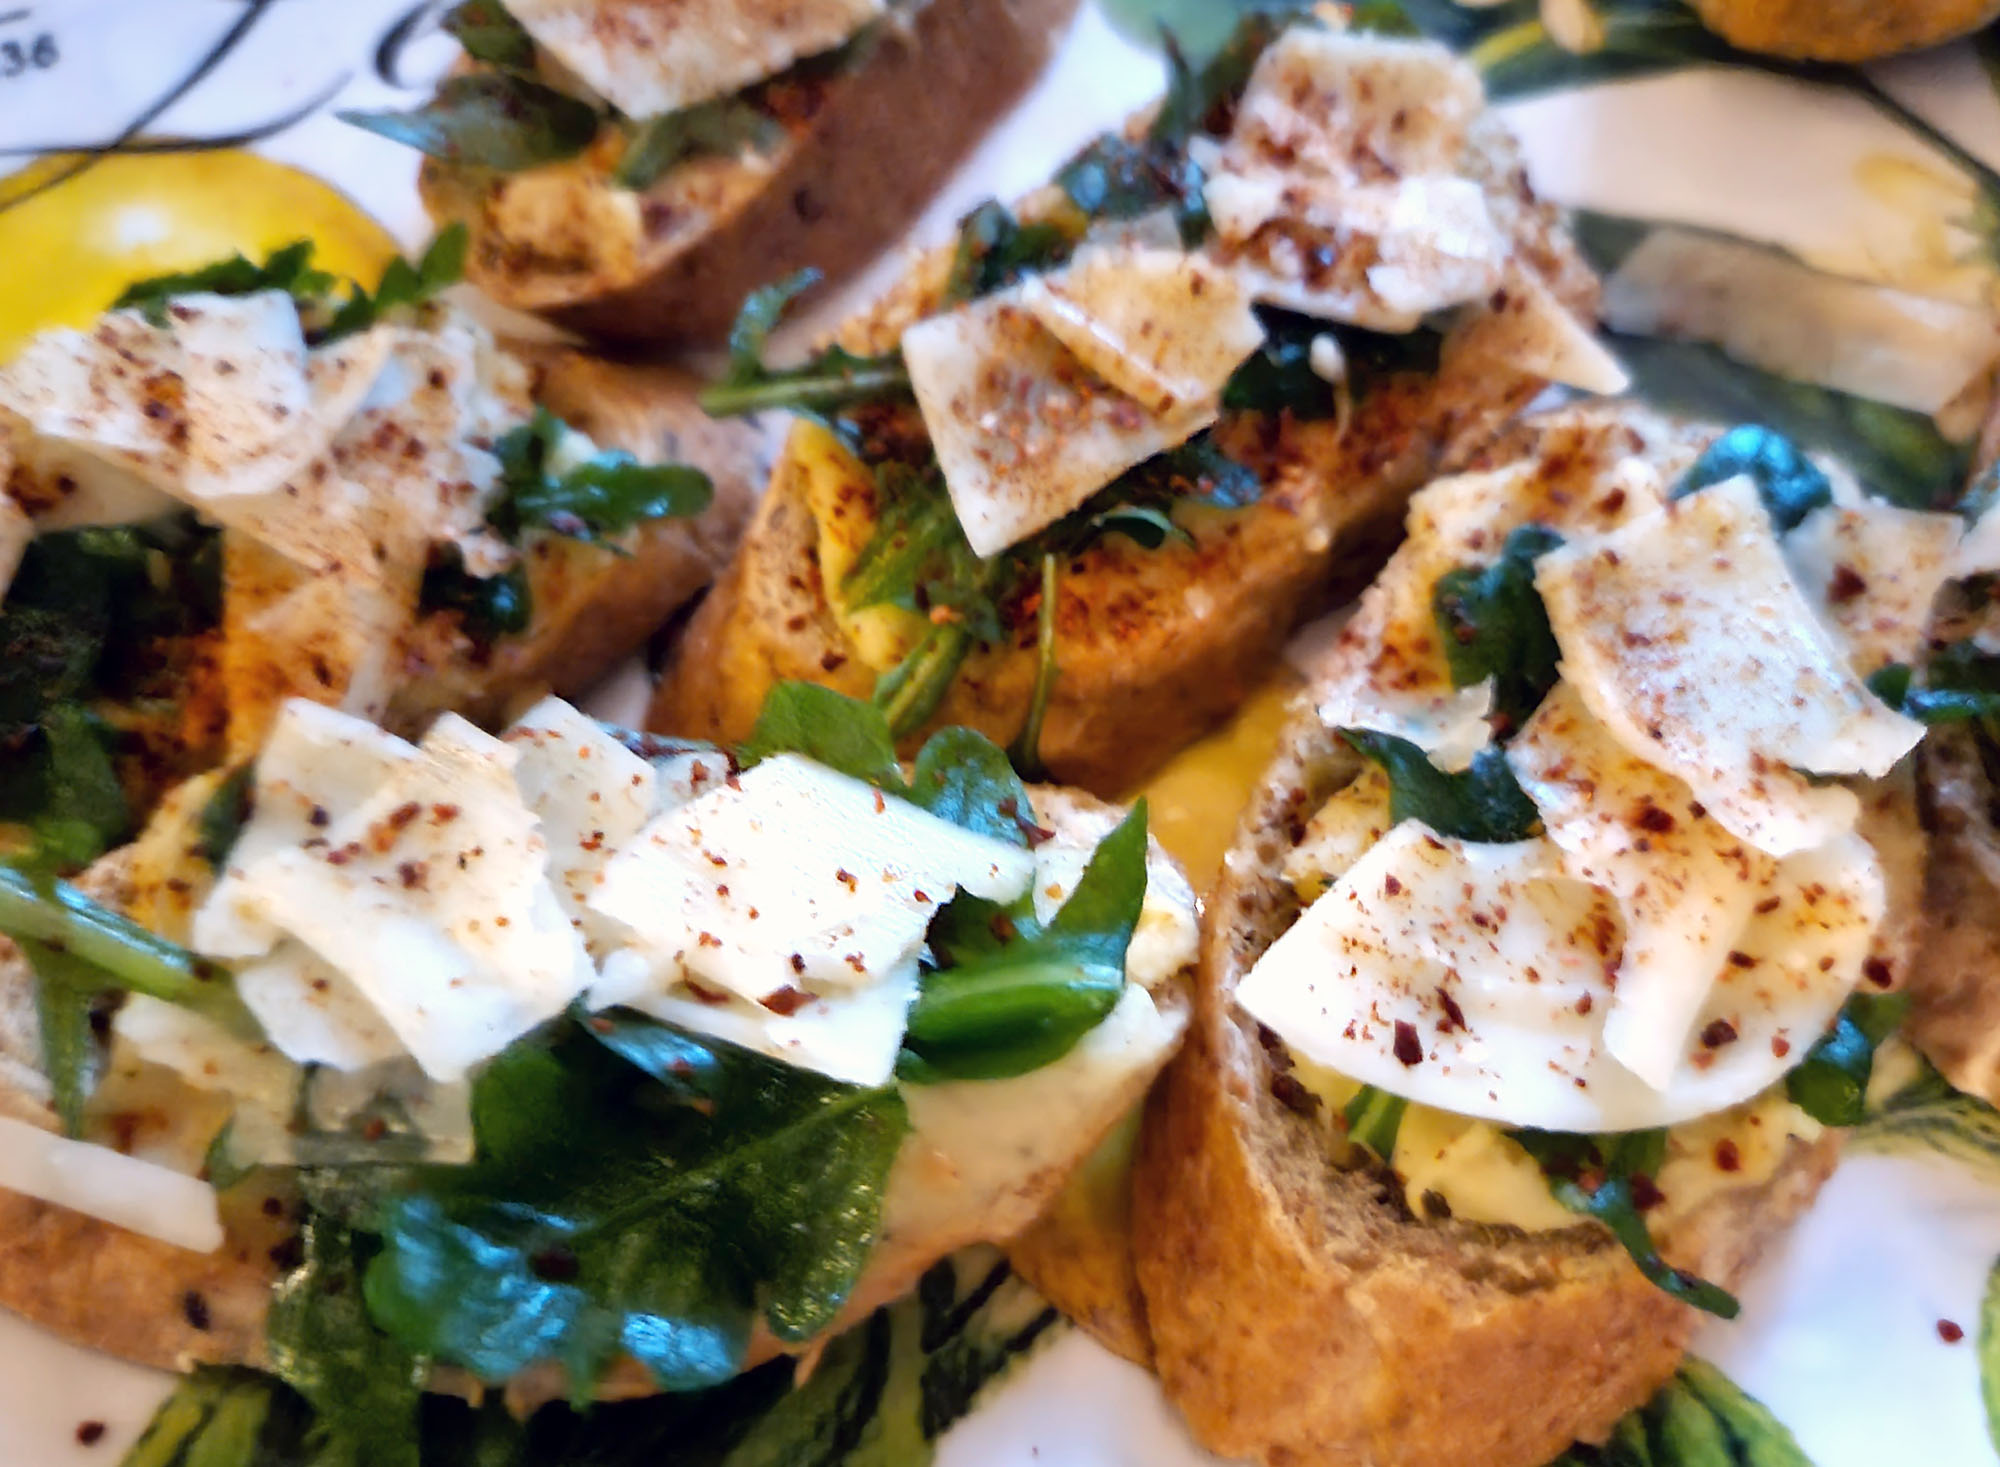
↓
 

Karney Family Recipes

Traditional and New Recipes For Sharing Around the Table


  • Home
  • About the Header
  • Contact Us
  • Privacy Policy
  • Terms of Use
Summer on the deck

WELCOME!

As I look back, I have many vivid and wonderful memories of family and friends gathering around the table to celebrate holidays, special events, and just the companionship of one another.

Meals were always a special event whether eaten at a table with cloth napkins, holiday decorations and the good china, or on a picnic table with a red checkered tablecloth on a balmy summer day.

Throughout history, meals have always occupied a special place in the world's great religions. As we gather for sustenance and companionship, we are in our most vulnerable human condition, and that's where the Divine enters. This is precisely why mealtime is sacred and shouldn't be subservient to television, texting, or other interruptions. We need each other's companionship and the opportunity to be fully human so much that we can't let distractions overwhelm us.

My wife, Natalie, and I have always enjoyed cooking. As our sons, Jared, Jeff, and Kevin got older they all became good cooks. For several years I had worked on putting together a book of both traditional family recipes and favorite newer recipes, but how do you ever say such a thing is done? So, I decided that the best solution would be to put the recipes online where they would be available to friends and family and now, of course, to anyone else who is interested. Now we have added Izabella, Amie, and Katy, three wonderful daughters-in-law, and grandchildren Evan, Annabelle, and Nicholas. With their extended families, I'm sure they will be contributing some wonderful recipes.

So! Make some great food, gather around the table with your loved ones and strangers as well, give thanks to God, share your stories, and celebrate life.

Bon appetit! - Mark Karney

Post navigation

← Older posts

Smoked Salmon & Cucumber Appetizer

Karney Family Recipes Posted on January 7, 2023 by Mark KarneyJanuary 29, 2023

I make a lot of smoked salmon appetizers, especially in the summer, and another go-to for us is Smoked Salmon Spread with fresh slice baguettes. But an occasion came up where I needed an appetizer that was gluten and dairy free. So I eliminated the cream cheese and built a recipe based on my Quick Aioli recipe. Click on the words Quick Aioli in the recipe to get to that recipe. This recipe received many compliments, and thus it earned a place on the website. It’s not difficult to make, but the assembly takes a little time.

Smoked Salmon & Cucumber Appetizer

January 7, 2023
by Mark Karney
Print this recipe

Ingredients

  • 2 English cucumbers
  • 8 ounces Nova Lox smoked salmon
  • 1/4 red onion diced fine
  • 1/2 bottle non-pareil capers – rinsed
  • 1/2 cup Quick Aioli

Instructions

  1. Prepare the Quick Aioli recipe.
  2. Peel alternate 1/4-inch strips from the cucumber.
  3. Slice the cucumber at an angle into oval 1/4-inch slices.
  4. Slice each piece of salmon into cucumber-sized rectangles.
  5. Place a piece or two of salmon on each slice of cucumber using all of the salmon.
  6. Spread about 1/2 teaspoon of the aioli on each piece of salmon.
  7. Top each piece with a little red onion and a few capers, pressing them into the aioli.

Nutrition Facts

Smoked Salmon & Cucumber Appetizer

Serves: 40

Amount Per Serving:
1 Piece
Calories 30.44 kcal
% Daily Value*
Total Fat 2.53 g 3.1%
Saturated Fat 0.4 g 0%
Trans Fat 0.0 g
Cholesterol 2.43 mg 0.7%
Sodium 183.12 mg 7.6%
Total Carbohydrate 0.89 g 0%
Dietary Fiber 0.26 g 0%
Sugars 0.31 g
Protein 1.27 g
Vitamin A 2.61 µg Vitamin C 0.71 mg
Calcium 5.39 mg Iron 0.18 mg

* Percent Daily Values are based on a 2,000 calorie diet. Your daily values may be higher or lower depending on your calorie needs.

Karney Family Recipes

Notes

You can use zucchini instead of cucumbers.

Share on social

© 2023 Copyright © 2020 by Norwest Communications Inc.
Posted in Appetizers, Seafood | Tagged appetizer

Linguine With Clam Sauce

Karney Family Recipes Posted on October 22, 2022 by Mark KarneyJanuary 29, 2023

Linguine With Clam Sauce

October 22, 2022
by Mark Karney
Print this recipe

Ingredients

  • 8 oz. cooked linguine
  • 1/4 cup EVOO
  • 3 cloves garlic, finely chopped
  • 1 Jalapeno pepper, finely chopped
  • 1 large shallot, finely chopped
  • 3 cans of chopped clams, 6.5 oz. per
  • 1/2 cup finely chopped fresh parsley
  • Oregano to taste
  • Black pepper to taste
  • Salt to taste
  • ******************
  • Splash of white wine (optional)
  • Lemon Juice and zest – about 1/4 lemon (optional)
  • 1 bottle of capers – 3.5 ounces (optional)
  • Caper juice to taste

Instructions

  1. Get your pasta cooking.
  2. Saute the garlic, shallot, and jalapeno in the EVOO until the shallot is translucent, add the capers if you are using them, and fry for a minute or so.
  3. Add the clams with juice and reduce for 4 or 5 minutes on medium heat. Add the wine now if you are using it.
  4. Add the parsley, oregano, and black pepper. Cook for a minute or two.
  5. Then add the cooked pasta, cook for a few more minutes until some of the sauce is absorbed.
  6. Taste and adjust the seasonings, then serve.

Notes

I really think the capers took this recipe over the top, but I haven’t tested it with capers AND wine. A squeeze of lemon juice and lemon zest was probably preferable to the wine when using capers.

Share on social

© 2023 Copyright © 2020 by Norwest Communications Inc.
Posted in Main Entrees, Pasta, Seafood | Tagged clams, pasta, seafood

Roasted Delicata Squash

Karney Family Recipes Posted on November 28, 2019 by Mark KarneyApril 18, 2022

The roots of this recipe are from a Masterclass I took online from Alice Waters. Delicata squash is a wonderful light winter squash. It doesn’t keep as well as other winter squashes so the availability is usually limited. If you find it at the grocery store or your farmer’s market, it’s worth a try. Grab it when you see it because it will be gone soon.

Roasted Delicata Squash

November 28, 2019
by Mark Karney
Print this recipe

Ingredients

  • 1 Delicata Squash
  • Olive Oil
  • Salt
  • White pepper
  • Nutmeg

Instructions

  1. Cut off the ends and peel the skin a bit—but don’t worry about getting into the crevices; the skin is edible. Cut in half lengthwise and scrape out the seeds.
  2. Slice into crescents of even thickness, about 1 inch, for even cooking.
  3. Toss with olive oil, salt, nutmeg and white pepper,
  4. Spread evenly on a baking sheet and roast at 375°F for 40 minutes, until tender and lightly browned, stirring occasionally.

Notes

An online cooking class from Alice Waters introduced me to this delicious vegetable. The spices are my own choice, based on some of the same spices I use in my Butternut Squash Soup.

Share on social

© 2023 Copyright © 2020 by Norwest Communications Inc.
Posted in All, Side Dishes, Vegan, Vegetables, Vegetarian

St. Louis Seasoning

Karney Family Recipes Posted on June 21, 2019 by Mark KarneySeptember 4, 2020

When Natalie and I go to St. Louis to visit Kevin, Katy, Evan, and Nicholas, we usually have breakfast at one of the First Watch restaurants. They are a breakfast/lunch-only restaurant and their menu is unique with fresh and healthy foods cooked with care. On a recent visit there, I discovered they had a cookbook, which I bought. Included was a recipe for their seasoning used in much of their cooking, First Watch seasoning. But, of course, I always adjust and modify recipes. (I can’t help myself.) I increased the spices a bit and added the smoked paprika.

So here’s my version which I call St. Louis Seasoning in order to avoid any copyright and trademark issues.

St. Louis Seasoning

June 21, 2019
by Mark Karney
Print this recipe

Ingredients

  • 1 cup Diamond Crystal Kosher Salt*
  • 1/3 cup ground black pepper
  • 1 tablespoon granulated garlic
  • 1 teaspoon onion powder
  • 1 tablespoon sweet Hungarian paprika
  • 2 teaspoons smoked sweet paprika

Instructions

  1. Mix all of the ingredients together thoroughly. Store in a tightly sealed container.
  2. Keep it on your counter, you’ll use it a lot.

Nutrition Facts

St. Louis Seasoning

Serves: 0

Amount Per Serving:
0
Calories 0
% Daily Value*
Total Fat 0 0
Saturated Fat 0
Trans Fat
Cholesterol 0
Sodium 0 0
Total Carbohydrate 0 0
Dietary Fiber 0 0
Sugars 0
Protein 0
Vitamin A 0 Vitamin C 0
Calcium 0 Iron 0

* Percent Daily Values are based on a 2,000 calorie diet. Your daily values may be higher or lower depending on your calorie needs.

Karney Family Recipes

Notes

*If you decide to use Morton Kosher Salt or regular salt, cut the amount of salt in half.

Share on social

© 2023 Copyright © 2020 by Norwest Communications Inc.
Posted in All, Rubs, Seasonings, & Marinades | Tagged First Watch, Seasoning

Beware Kosher Salt!

Karney Family Recipes Posted on April 20, 2019 by Mark KarneySeptember 4, 2020

Now, there is really nothing wrong with Kosher Salt except for the fact there are two distinctly different types, and if you use the wrong kind you will really mess up your recipe.

When we so to St. Louis to visit Kevin, Katy and Evan we will almost always eat breakfast at a restaurant names First Watch. I had always thought it was a small local chain, but recently found out it is a relatively large US chain.

We love the breakfasts at First Watch. They are healthy, they use the freshest ingredients, and do a superb job of providing an alternative to the sugary, fat-laden breakfasts that are typical in most places.

We went there the last time we were in St. Louis and I was delighted to find out that they have published a cookbook, which I immediately purchased.

The next week, I mixed up some special First Watch seasoning from the cookbook and proceeded to use it to re-create their fabulous roasted potatoes. With great anticipation of the potatoes on my plate, I tasted them and found that they were so salty, they were inedible.

Terribly disappointed I checked my recipe against the book and determined that I had followed the book correctly. Was it a misprint? Did they print Tablespoons for the amount of salt when they really meant teaspoons? I assumed that there was a misprint and was planning on contacting the publisher, but as usual got sidetracked with all the other demands of life.

A few weeks later, I was reading Samin Nosrat’s bestseller, Salt Fat Acid Heat, and got my answer. True Kosher salt is dried by a process that forms light, flaky crystals of salt that dissolve easily. The brand that most restaurant kitchens have is Diamond Crystal Kosher Salt. On the other hand, Morton Kosher Salt (the kind I had) is formed of large cubical crystals. A tablespoon of Morton Kosher Salt weighs almost twice as much as a tablespoon of Diamond Crystal Kosher Salt and thus is twice as salty. They are both pure salt, but because the Morton variety is much denser, it is twice as salty as the same volume of Diamond Crystal Kosher salt.

The problem is not in the salt, but the way we measure. If we measured by weight (grams), it wouldn’t matter which kind of salt you used. One gram of either would have the same saltiness. But, since we in the states typically measure by volume, (cups, tablespoons, teaspoons) we find that a tablespoon of Morton Kosher salt weighs almost twice as much as a tablespoon of Diamond Crystal Kosher Salt. This makes a good case for measuring by weight rather than volume and is especially important in things like pickling, canning and baking.

I am assuming that most recipes that specify Kosher Salt imply a light salt like Diamond Crystal Kosher salt because that seems to be what most chefs use. It is also better to err by using a less salty product like Diamond Crystal Kosher salt because you can always add more salt if the dish isn’t salty enough. If you oversalt, there is usually no easy fix.

Posted in All, Tips & Techniques

New Section on Tips & Techniques

Karney Family Recipes Posted on April 20, 2019 by Mark KarneySeptember 4, 2020

I decided to depart from the “recipes only” format and add a section on cooking tips and techniques. Now, that the kitchen remodeling is done and we have a nice new kitchen, I am spending more time honing my cooking skills and enjoying it immensely.

Newly remodeled kitchen.
Our new kitchen.

I’ve been taking some online classes from famous cooks at MasterClass.com and learning some interesting ideas. I have also read Samin Nosrat’s bestseller, Salt Fat Acid Heat, and it’s the first book that I have read that talks in depth about balancing flavors in food.

So, I’ll periodically post some of the most useful gems that I find in this material.

Posted in All, Tips & Techniques

Huevos Whatever

Karney Family Recipes Posted on February 1, 2019 by Mark KarneySeptember 4, 2020

We were caught in a January Polar Vortex with temperatures in the minus range and I needed to drive Natalie to work since her car wouldn’t start. I knew I had part of a loaf of multigrain bread left for a quick breakfast of toast and coffee. I went to slice the bread, but mold had beat me to it. Panic! I looked in the refrigerator and the closest thing I had to bread was a package of corn tortillas, but toasted tortillas wouldn’t cut it for breakfast. So. in a few minutes, this is what I came up with. Usually desperation cooking produces OK results, this one turned out superb, so it made the website. Unfortunately, my Spanish vocabulary is very limited.

Huevos Whatever

February 1, 2019
by Mark Karney
Print this recipe

Ingredients

  • 3 eggs
  • 1/2 medium onion
  • 2 medium Jalapeno peppers
  • 1 teaspoon olive oil for frying
  • 1/2 teaspoon fresh ground black pepper
  • 4 corn tortillas, 6 inch
  • 1/2 cup Mexican cheese blend
  • 2 cups arugula
  • 1/3 cup prepared salsa
  • 1/3 cup guacamole or avocado

Instructions

  1. Dice the onions and Jalapeno and fry in the oil until they start to brown.
  2. Beat the eggs with a whisk and add the black pepper to the mix.
  3. Add the eggs to the skillet and scramble. Add 1/2 of the cheese to the mixture and remove from heat.
  4. Preheat your broiler.
  5. Wrap the tortillas in a damp paper towel and microwave for 15 or 20 seconds.
  6. Line a small sheet pan with foil or parchment. Divide the eggs into four parts. Fill half of each tortilla with eggs and then fold over the other half of the tortilla. Put them on the sheet pan and hold it closed with a couple of toothpicks.
  7. Sprinkle the rest of the cheese over and put them under the broiler until the cheese melts and starts to brown.
  8. Put a layer of Arugula on each plate and then top with the filled tortillas. Remove the toothpicks and top with the salsa. Serve a small scoop of guacamole on the side.

Nutrition Facts

Huevos Whatever

Serves: 2

Amount Per Serving:
2 Tortillas
Calories 405.91 kcal
% Daily Value*
Total Fat 23.28 g 35.4%
Saturated Fat 8.61 g 40%
Trans Fat 0.36 g
Cholesterol g 0
Sodium 609.48 mg 25.4%
Total Carbohydrate 31.98 g 10.3%
Dietary Fiber 6.84 g 24%
Sugars 4.77 g
Protein 19.82 g
Vitamin A Vitamin C
Calcium Iron

* Percent Daily Values are based on a 2,000 calorie diet. Your daily values may be higher or lower depending on your calorie needs.

Karney Family Recipes

Notes

You can add whatever you want to the scrambled eggs depending on your preferences. If you don’t have guacamole, diced avocado with a squeeze of lemon or lime can be served on the side.

Share on social

© 2023 Copyright © 2020 by Norwest Communications Inc.
Posted in All, Breakfast, Mexican, Vegetarian | Tagged eggs, huevos, Mexican, tortillas, tortillas huevos eggs, vegetarian

Fritatta with Avocado, Cucumber and Arugula

Karney Family Recipes Posted on January 25, 2019 by Mark KarneySeptember 4, 2020

When Natalie and I travel we often stay at Marriott Couryard’s and usually have breakfast in their Bistro. My favorite item on the breakfast menu was their eggwhite frittata. They have changed their menu and still offer the frittata, but it isn’t the same as the original one. Here’s my take on their original frittata, which is a healthy way to begin the day.

Fritatta with Avocado, Cucumber, and Arugula

January 25, 2019
by Mark Karney
Print this recipe

Ingredients

  • 2 eggs
  • 1 teaspoon Olive oil
  • 1/2 avocado, diced
  • 1 small lemon wedge
  • 1 baby cucumber halved lengthwise and diced
  • 1 cup Arugula
  • 2 tablespoons shredded Mexican cheese
  • 3 tablespoons Mexican salsa

Instructions

  1. Warm up a warming drawer, or heat your oven to about 140° F and then turn off. Put your plate(s) in the oven to warm.
  2. Peel and dice the avocado into 3/4 inch cubes and squeeze the lemon juice over them.
  3. Halve the cucumber lengthwise, and dice into 3/8 inch pieces.
  4. Beat the egg(s). Heat a non-stick skillet and pour in the egg, spreading it over the pan as you would a crepe.
  5. Sprinkle the cheese over the egg. When the egg is done and cheese begins to melt, slide the egg carefully onto the plate and return the plate to the oven or warmer.
  6. Put 1 teaspoon of olive oil in the pan and saute the arugula in the pan until it begins to wilt.
  7. Remove the plate from the oven and top with the arugula. Arrange the pieces of avocado and cucumber over the arugula and top with salsa.
  8. Serve immediately.

Nutrition Facts

Fritatta with Avocado, Cucumber, and Arugula

Serves: 1 serving

Amount Per Serving:
Recipe
Calories 485.35 kcal
% Daily Value*
Total Fat 38.14 g 58.5%
Saturated Fat 11.46 g 55%
Trans Fat 0.39 g
Cholesterol 351.21 mg 117%
Sodium 715.03 mg 29.8%
Total Carbohydrate 18.09 g 6%
Dietary Fiber 8.67 g 32%
Sugars 5.41 g
Protein 22.24 g
Vitamin A 29.68 % Vitamin C 21.85 %
Calcium 33.3 % Iron 16.4 %

* Percent Daily Values are based on a 2,000 calorie diet. Your daily values may be higher or lower depending on your calorie needs.

Karney Family Recipes

Notes

This is not a difficult recipe to make, once you get the hang of it. The heated plate is important as the thin egg pancake will cool quickly on a cold plate.
Amounts are approximate, so adjust them to your liking. You can substitute egg whites for the eggs if you desire. I prefer a salsa that has lemon or lime juice in it rather than vinegar, so read your ingredients when you buy the salsa.
If you are cooking for more than one, it might be easier to have a separate skillet to saute the arugula.

Share on social

© 2023 Copyright © 2020 by Norwest Communications Inc.
Posted in All, Breakfast | Tagged arugula, avocado, breakfast, cucumber, frittata

Summer Potato Salad With Tomatoes and Olives

Karney Family Recipes Posted on July 14, 2018 by Mark KarneySeptember 4, 2020

Here’s a potato salad that makes use of summer vegetables and is lighter than traditional potato salad and should hold up better in the heat because it contains no mayonnaise or eggs. It’s also delicious! I found the basic recipe idea on Food Network and modified it for my tastes. It features Castelvetrano olives which have become a favorite with me.

Summer Potato Salad With Tomatoes and Olives

July 14, 2018
by Mark Karney
Print this recipe

Ingredients

  • 2 pounds small red-skinned or multi-colored potatoes, cut into bite-sized pieces.
  • 1 ¾ pounds Roma tomatoes, seeded and chopped
  • 4 stalks celery, diced
  • 1 cup Castelvetrano olives, pitted and quartered lengthwise,
  • ½ red onion, sliced thin
  • 1/2 cup extra-virgin olive oil
  • 1/4 cup Champagne or white wine vinegar
  • 1/4 cup fresh basil, coarsely chopped
  • 1/3 cup chopped fresh chives
  • Kosher salt
  • Freshly ground pepper

Instructions

  1. Place the potatoes in a large pot; cover with water and bring to a boil. Reduce to a simmer and cook until the potatoes are tender, about 10 more minutes. Drain the potatoes and rinse; let cool 15 to 20 minutes.
  2. Whisk the olive oil, vinegar, 1 teaspoon salt and several generous grinds of pepper in a medium bowl.
  3. Mix the potatoes, tomatoes, onion, olives, and diced celery in a large bowl and drizzle with the vinaigrette.
  4. Scatter the basil and chives over the salad and season with salt and pepper to taste.

Notes

Castelvetrano olives are a lighter, buttery flavored olive, and I would advise that you use ones from the olive bar rather than bottled. Castelvetrano olives are key to the recipe, but if you need to substitute another type of green olive, I would advise cutting back on the amount in the recipe.

Share on social

© 2023 Copyright © 2020 by Norwest Communications Inc.

Posted in All, Picnic, Salads, Side Dishes, Vegan, Vegetarian | Tagged olive, picnic, potato, potato salad, tomato

Grandma Jeanne’s Calico Beans

Karney Family Recipes Posted on June 9, 2018 by Mark KarneySeptember 4, 2020

We have been blessed to live in a friendly and loving neighborhood since the boys were very young, and participated in many picnics and parties with our neighbors. Everyone had their specialty item, and Charlotte Welch always made a pot of Calico Beans, which several of us guys referred to as “Beans to die for.” There were never any leftovers on the beans.

When Char moved to Santa Fe, there were no more beans until she graciously gave us the recipe, which she got from her sister, Jeanne. Char always doubled the recipe, and there were still no leftovers, and I would recommend you do the same.

Now, I’ve never met a recipe that I wouldn’t mess with, and this one is no exception, thus the optional Jack Daniels. I’ve been adding Jack Daniels to my barbecues sauces for years since I picked up the Jack Daniel’s Old Time Barbecue Cookbook while driving through Tennessee, many years ago. It seemed appropriate for this recipe, too.


Grandma Jeanne’s Calico Beans

June 9, 2018
by Mark Karney
Print this recipe

Ingredients

  • ½ pound Bacon (diced)
  • ½ pound ground beef
  • ½ cup chopped onions
  • 1 (15 ounce) can kidney beans (light or dark)
  • 1 (15 ounce) can baked beans
  • 1 (15 ounce) can butter beans (drain half liquid)
  • 1 tablespoon vinegar
  • ½ cup catsup
  • 1 teaspoon prepared mustard
  • ¼ cup brown sugar
  • ¼ cup Jack Daniels Whiskey (optional)

Instructions

  1. Cook the bacon in a frying pan, and drain all but a little grease when done.
  2. Add the beef and onions and cook until browned.
  3. Put the browned meat and onions in a bean pot with the beans, draining half the liquid from the butter beans only.
  4. Add the vinegar, catsup and mustard and brown sugar. (Optionally, add ¼ cup Jack Daniels Whiskey)
  5. Bake covered at 350 for 1 hr. Remove the cover about halfway through if the beans are too wet.

Nutrition Facts

Grandma Jeanne’s Calico Beans

Serves: 12 Servings

Amount Per Serving:
1/2 cup
Calories 266.24 kcal
% Daily Value*
Total Fat 11.96 g 16.9%
Saturated Fat 4.1 g 20%
Trans Fat 0.25 g
Cholesterol 25.89 mg 8.3%
Sodium 463.35 mg 19.3%
Total Carbohydrate 26.37 g 8.7%
Dietary Fiber 4.87 g 16%
Sugars 9.53 g
Protein 11.78 g
Vitamin A 1.2 % Vitamin C 10.69 %
Calcium 4.64 % Iron 13.74 %

* Percent Daily Values are based on a 2,000 calorie diet. Your daily values may be higher or lower depending on your calorie needs.

Karney Family Recipes

Share on social

© 2023 Copyright © 2020 by Norwest Communications Inc.

Posted in All, Picnic, Side Dishes | Tagged baked beans, Beans

Towne Shoppe’s Hamburger Soup

Karney Family Recipes Posted on February 18, 2018 by Mark KarneySeptember 4, 2020

Years ago, there was a Soda Fountain/Magazine Shop in downtown Barrington called the Towne Shoppe. I think it had been there forever. There was the typical long counter that you would find in a Soda Fountain along with the requisite round stools attached to the floor with red vinyl cushions. The food was simple, bagels in the morning, soup and sandwiches the rest of the day. I went in almost every morning for a bagel and tea, and would sometimes pick up soup for lunch since it was only a short block away from my studio. My all-time favorite soup was one that they had only occasionally, and that was hamburger soup. It was unique as it was not tomato based, and it wasn’t overly flavored with beef broth as you might find in a beef-barley or beef vegetable soup.

Recently, I was preparing soup for a dinner with friends and thought I would try and replicate it from my 20-year old memory. Unlike my normal cooking experiences when I try to replicate an unknown recipe, which usually requires many attempts and adjustments, I hit this one on the first try. The soup matched my memory of the Towne Shoppe’s soup and my friends raved about it. This recipe will serve at least 12, and you can adjust the amounts of the ingredients to your liking. Enjoy!

Towne Shoppe's Hamburger Soup

February 18, 2018
by Mark Karney
Print this recipe

Ingredients

  • 2 pounds lean ground beef
  • Black pepper to taste
  • 3 Tbsp. olive oil
  • 1 large white onion. diced
  • 1 pound of carrots, cleaned and diced
  • 3 stalks of celery, diced
  • 1 large sweet red pepper, diced
  • 3 cloves of garlic, chopped fine
  • 3 tablespoons. white flour
  • 4 pounds of waxy potatoes (Red or Yukon Gold), diced
  • 32 ounces beef stock or broth
  • 64 ounces chicken or vegetable stock or broth
  • 1 pound frozen corn
  • 2 teaspoons thyme (French thyme if you have it)
  • Salt (to taste)

Instructions

  1. Brown the hamburger in a skillet, sprinkle liberally with black pepper, drain any excess grease, and transfer to the soup pot.
  2. Add the oil to the skillet and then add the onion, carrots, celery, pepper, and garlic. Sprinkle with black pepper. Saute the vegetables over medium heat until they start to soften and the onions become translucent.
  3. Lower the heat, and sprinkle the flour over the vegetables and mix in with your spatula. Keep scraping the bottom of the pan to keep the flour from burning.
  4. When the flour starts to brown and is absorbed into the oil, add the vegetable mixture to the soup pot.
  5. Return the frying pan to the heat, turn it to medium-high, and deglaze the pan with about a cup of broth. Scrape the pan to remove the fond and add the mixture to the soup pot.
  6. Add the potatoes to the soup pot, and then the broth. Turn the heat under the soup pot to high and bring it to a boil, stirring frequently. When it boils, lower the heat to a simmer.
  7. Set the bag of corn out to thaw a bit. While the soup is cooking, add a little oil to the frying pan and lightly brown the sausage.
  8. When the potatoes are almost done (about 20 minutes) , add the corn, sausage, and the thyme.
  9. Taste the soup and add 1 tsp. salt at a time until it has the desired saltiness.
  10. Adjust the other seasonings if necessary.
  11. Serve when the corn and sausage are heated through.

Nutrition Facts

Towne Shoppe's Hamburger Soup

Serves: 16 Servings

Amount Per Serving:
2 cups
Calories 356.1 kcal
% Daily Value*
Total Fat 15.79 g 23.1%
Saturated Fat 5.14 g 25%
Trans Fat 0.67 g
Cholesterol 43.66 mg 14.3%
Sodium 999.87 mg 41.6%
Total Carbohydrate 36.95 g 12%
Dietary Fiber 4.77 g 16%
Sugars 5.98 g
Protein 17.7 g
Vitamin A 29.03 % Vitamin C 44.89 %
Calcium 5.59 % Iron 15.82 %

* Percent Daily Values are based on a 2,000 calorie diet. Your daily values may be higher or lower depending on your calorie needs.

Karney Family Recipes

Share on social

© 2023 Copyright © 2020 by Norwest Communications Inc.

Posted in All, Main Entrees, Soups | Tagged hamburger, sausage, soup

Pureed Celery Root

Karney Family Recipes Posted on December 22, 2017 by Mark KarneySeptember 4, 2020

We are always looking for new vegetables and interesting ways to serve them. Celery root or celeriac is a root vegetable that probably most people aren’t familiar with. It is rich in fiber and vitamins and has less than half the carbohydrates of a comparable amount of potato.

In the past, Natalie and I have attended the Food and Wine Festival at Disneyworld’s EPCOT. You can literally eat your way through EPCOT sampling wines and small plates of food from many different countries and different regional American cuisines. This last time, we tried a dish of seared scallops served over pureed celery root with sauteed mushrooms. It was exquisite.

A month or so after that I was wandering through the produce department of my local grocery store looking for something different and saw some large beautiful celery roots, so I bought one with that dish from the Food and Wine Festival in mind. When I got home, I consulted my copy of The Flavor Bible, a book by Karen Page and Andrew Dornenburg which is my most-used cooking resource and it indicated that celery root pairs well with seafood. It also listed mayonnaise, mustard, and lemon as a favored combination with celery root. After a bit of tasting, I worked out this recipe. It paired well with salmon, and I served it several times thereafter.

I hope you will try it and enjoy it

Pureed Celery Root

December 22, 2017
by Mark Karney
Print this recipe

Ingredients

  • 1 large celery root, 1 ¾ pound. peeled and cleaned
  • 1 large Russet potato (1/2 lb.)
  • 5 tablespoons Mayonnaise (use vegan mayo for a totally vegan dish)
  • 3 teaspoons Dijon mustard
  • Juice of 1/6 of a lemon
  • Salt to taste (if needed)

Instructions

  1. Peel the celery root and dice into 1-inch cubes.
  2. Peel the potato and dice into 1-inch cubes.
  3. Put the potato and celery root into a pan of water and bring to a boil, continue cooking until done.
  4. Add the next three ingredients and puree in a food processor.
  5. Add salt to taste if necessary. There is usually enough in the mayo and the mustard.

Nutrition Facts

Pureed Celery Root

Serves: 7 servings

Amount Per Serving:
6 ounces
Calories 119.61 kcal
% Daily Value*
Total Fat 8.23 g 12.3%
Saturated Fat 1.25 g 5%
Trans Fat 0.0 g
Cholesterol 4.02 mg 1.3%
Sodium 259.01 mg 10.8%
Total Carbohydrate 10.64 g 3.3%
Dietary Fiber 1.61 g 4%
Sugars 1.25 g
Protein 1.59 g
Vitamin A 0.01 % Vitamin C 8.15 %
Calcium 3.29 % Iron 3.94 %

* Percent Daily Values are based on a 2,000 calorie diet. Your daily values may be higher or lower depending on your calorie needs.

Karney Family Recipes

Notes

Most of the calories are coming from the mayonnaise, so you can cut back on that to reduce the calories even further.
The dish can be made ahead and reheated.

Share on social

© 2023 Copyright © 2020 by Norwest Communications Inc.

Pureed Celery Root

December 22, 2017
by Mark Karney
Print this recipe

Ingredients

  • 1 large celery root, 1 ¾ pound. peeled and cleaned
  • 1 large Russet potato (1/2 lb.)
  • 5 tablespoons Mayonnaise (use vegan mayo for a totally vegan dish)
  • 3 teaspoons Dijon mustard
  • Juice of 1/6 of a lemon
  • Salt to taste (if needed)

Instructions

  1. Peel the celery root and dice into 1-inch cubes.
  2. Peel the potato and dice into 1-inch cubes.
  3. Put the potato and celery root into a pan of water and bring to a boil, continue cooking until done.
  4. Add the next three ingredients and puree in a food processor.
  5. Add salt to taste if necessary. There is usually enough in the mayo and the mustard.

Nutrition Facts

Pureed Celery Root

Serves: 7 servings

Amount Per Serving:
6 ounces
Calories 119.61 kcal
% Daily Value*
Total Fat 8.23 g 12.3%
Saturated Fat 1.25 g 5%
Trans Fat 0.0 g
Cholesterol 4.02 mg 1.3%
Sodium 259.01 mg 10.8%
Total Carbohydrate 10.64 g 3.3%
Dietary Fiber 1.61 g 4%
Sugars 1.25 g
Protein 1.59 g
Vitamin A 0.01 % Vitamin C 8.15 %
Calcium 3.29 % Iron 3.94 %

* Percent Daily Values are based on a 2,000 calorie diet. Your daily values may be higher or lower depending on your calorie needs.

Karney Family Recipes

Notes

Most of the calories are coming from the mayonnaise, so you can cut back on that to reduce the calories even further.
The dish can be made ahead and reheated.

Share on social

© 2023 Copyright © 2020 by Norwest Communications Inc.

Posted in All, Side Dishes, Vegan, Vegetables, Vegetarian

Chili Cheese Balls

Karney Family Recipes Posted on December 16, 2017 by Mark KarneySeptember 4, 2020

We made this recipe quite often in the past and recently made it again and remembered how good these cheese balls were. This is a relatively easy recipe to make and a bit different than the usual fare. They are a nice addition to any holiday platter.

Chili Cheese Balls

December 16, 2017
by Mark Karney
Print this recipe

Ingredients

  • 3 cups Monterey Jack cheese, grated
  • 1 cup Fontina cheese, grated
  • 1 (3-ounce) package cream cheese at room temperature
  • 4 teaspoons prepared mustard
  • 1 teaspoon Worcestershire sauce
  • ½ teaspoon garlic powder
  • 4 teaspoons chili powder

Instructions

  1. Combine the first six ingredients with 2 tsp. of the chili powder and mix until well blended.
  2. Roll into bite-sized balls.
  3. Sprinkle the remaining chili powder into a large bowl, add the cheese balls and toss gently until they are coated.
  4. Chill before serving.

Nutrition Facts

Chili Cheese Balls

Serves: 10

Amount Per Serving:
3 balls
Calories 233.35 kcal
% Daily Value*
Total Fat 19.24 g 29.2%
Saturated Fat 11.76 g 55%
Trans Fat 0.0 g
Cholesterol 59.91 mg 19.7%
Sodium 432.99 mg 18%
Total Carbohydrate 1.7 g 0.3%
Dietary Fiber 0.47 g 0%
Sugars 0.83 g
Protein 13.82 g
Vitamin A 17.79 % Vitamin C 0.1 %
Calcium 38.19 % Iron 3.37 %

* Percent Daily Values are based on a 2,000 calorie diet. Your daily values may be higher or lower depending on your calorie needs.

Karney Family Recipes

Share on social

© 2023 Copyright © 2020 by Norwest Communications Inc.

Posted in All, Appetizers, Holidays, Snack Foods, Vegetarian

Asian Turkey Burgers

Karney Family Recipes Posted on September 8, 2017 by Mark KarneySeptember 4, 2020

When we went to St. Louis to view the 2017 eclipse, Kevin and Katy built a party around the event and served these luscious Asian Turkey Burgers. They reminded us of our Porkies (Barbecued Pork Patties) on this site, but are probably a bit healthier. We made them for a group of friends and they were a real hit.

Asian Turkey Burgers

September 8, 2017
by Mark Karney
Print this recipe

Ingredients

  • 1 pound ground turkey
  • 2 shallots, finely chopped
  • 2 cloves garlic, minced
  • 2 teaspoon fresh ginger, finely chopped
  • 1 cup cilantro, chopped
  • 1 teaspoon Sriracha
  • 4 teaspoons light soy sauce
  • Salt
  • Pepper
  • 1/2 cup mayonnaise
  • 4 hamburger buns

Instructions

  1. Preheat the oven to 450 degrees.
  2. In a large bowl, combine the ground turkey, shallot, ginger, garlic, 1/2 cup cilantro, 1 teaspoon sriracha, and 4 teaspoons soy sauce.
  3. Season with salt and pepper.
  4. Form the mixture into 4 patties (The mixture will be very soft, finish forming them once they are in the pan.)
  5. Heat a little oil in a large frying pan over medium high-heat. Season the burgers liberally with salt and pepper. Add the burgers to the pan and cook for 2-3 minutes per side, until browned.
  6. Transfer the burgers to a foil-lined cookie sheet in the oven to finish cooking for 5-7 minutes.
  7. Meanwhile, In a small bowl, combine the mayonnaise and as much sriracha as you like. Season to taste with salt and pepper.
  8. Split the buns and place in the oven to toast for 2-3 minutes.
  9. Assemble the burgers: Spread a little sriracha mayo onto each bun, then top with a turkey burger and some of the remaining cilantro.

Nutrition Facts

Asian Turkey Burgers

Serves: 4

Amount Per Serving:
1 burger
Calories 513.9 kcal
% Daily Value*
Total Fat 32.6 g 49.2%
Saturated Fat 6.01 g 30%
Trans Fat 0.12 g
Cholesterol 89.51 mg 29.7%
Sodium 610.2 mg 25.4%
Total Carbohydrate 27.53 g 9%
Dietary Fiber 2.19 g 8%
Sugars 5.1 g
Protein 27.85 g
Vitamin A 4.04 % Vitamin C 5.01 %
Calcium 11.5 % Iron 18.11 %

* Percent Daily Values are based on a 2,000 calorie diet. Your daily values may be higher or lower depending on your calorie needs.

Karney Family Recipes

Notes

Ground turkey does not hold it's shape well, so it is essential to pan-fry the burgers. They would probably not work well on the grill.

Share on social

© 2023 Copyright © 2020 by Norwest Communications Inc.


Posted in All, Main Entrees, Poultry | Tagged asian, burger, turkey

Oven Dried Tomatoes

Karney Family Recipes Posted on August 27, 2017 by Mark KarneySeptember 4, 2020

Oven Dried Tomatoes

Oven Dried Tomatoes going into the oven.

Dried Plum Tomatoes are absolutely luscious. The drying process intensifies the flavor and sweetness. These dried tomatoes freeze well and pulling out a package in the dead of winter, returns you instantly to the taste of fresh tomatoes from the garden. They are great in salads and can be used wherever sun-dried tomatoes are called for. It’s also an easier process than canning, and when the peak yield of tomatoes hits in late summer, this is a way to enjoy the crop later in the year, long after the tomato plants have been pulled up

Oven Dried Tomatoes

August 27, 2017
by Mark Karney
Print this recipe

Ingredients

  • Fresh Roma tomatoes
  • Olive oil
  • Granulated garlic
  • Black pepper
  • Salt

Instructions

  1. Wash and dry the tomatoes.
  2. Cut in half lengthwise, And remove the stem.
  3. Coat with olive oil, place on foil lined cookie sheet, cut side up.
  4. Sprinkle generously with black pepper and granulated garlic, and a little salt if desired.
  5. Put in 225 degree oven, with convection if possible. Drying time is approximately 6 hours. You want the tomatoes to be somewhat leathery, not totally dried out.

Nutrition Facts

Oven Dried Tomatoes

Serves:

Amount Per Serving:
Calories 0
% Daily Value*
Total Fat 0 0
Saturated Fat 0
Trans Fat
Cholesterol 0
Sodium 0 0
Total Carbohydrate 0 0
Dietary Fiber 0 0
Sugars 0
Protein 0
Vitamin A 0 Vitamin C 0
Calcium 0 Iron 0

* Percent Daily Values are based on a 2,000 calorie diet. Your daily values may be higher or lower depending on your calorie needs.

Karney Family Recipes

Notes

It is probably best to separate the tomatoes into batches of larger and smaller sizes as the smaller ones will be done quicker. If the small ones are on their own cookie sheet, this will make your job easier.
For later use, I freeze the tomatoes on the cookie sheets and when they are frozen put them into small freezer bags which should keep in the freezer for at least a year.

Share on social

© 2023 Copyright © 2020 by Norwest Communications Inc.

Posted in All, Salads, Vegan, Vegetables, Vegetarian | Tagged dried tomato, plum tomato, roma, tomato, vegan, vegetarian

Tortellini with Castelvetrano Olives, Grape Tomatoes, & Basil

Karney Family Recipes Posted on April 30, 2017 by Mark KarneySeptember 4, 2020

Castelvetrano olives are a real joy. I discovered them in the Olive Bar at our local Heinan’s grocery store and have become addicted. They are buttery in flavor and not overly salty. They are great for snacking or in recipes. (Buy from the olive bar, the bottled ones are a little too briny.) So here’s a recipe I came up with to use them for a quick, but elegant dinner. I’ve made this 4 or 5 times in the past couple of months, so it’s time to add it to the website.

Tortellini with Castelvetrano Olives, Grape Tomatoes, & Basil

April 30, 2017
by Mark Karney
Print this recipe

Ingredients

  • Pasta - 20 oz. fresh cheese tortellini
  • 1 large shallot, finely diced (about ¾ cup)
  • 2 large Jalapeno peppers, finely diced
  • 3 large cloves garlic, finely diced
  • 1 10 ounce package grape tomatoes, halved
  • 1 ½ cups Castelvetrano olives, pitted and quartered
  • 1 cup Parmesan cheese, grated
  • 1.5 ounce fresh basil, chopped (About 1 cup loose)
  • ¼ cup extra-virgin olive oil

Instructions

  1. Cook pasta. Reserve ½ to 1 cup of water.
  2. Saute shallots, jalapeno peppers, and garlic in olive oil until translucent and slightly brown.
  3. Add halved grape tomatoes and pitted and quartered Castelvetrano olives and saute just a little bit.
  4. Add pasta water and parmesan and mix until slightly thickened.
  5. Mix with pasta and fresh chopped basil and serve.

Nutrition Facts

Tortellini with Castelvetrano Olives, Grape Tomatoes, & Basil

Serves: 4 generous servings

Amount Per Serving:
2 cups
Calories 896.0 kcal
% Daily Value*
Total Fat 30.92 g 46.2%
Saturated Fat 9.11 g 45%
Trans Fat 0.0 g
Cholesterol 25.28 mg 8.3%
Sodium 899.59 mg 37.5%
Total Carbohydrate 120.59 g 40%
Dietary Fiber 8.55 g 32%
Sugars 8.97 g
Protein 34.3 g
Vitamin A 16.62 % Vitamin C 29.18 %
Calcium 56.04 % Iron 27.2 %

* Percent Daily Values are based on a 2,000 calorie diet. Your daily values may be higher or lower depending on your calorie needs.

Karney Family Recipes

Share on social

© 2023 Copyright © 2020 by Norwest Communications Inc.

Posted in All, Main Entrees, Pasta, Vegetarian | Tagged castelvetrano olives, olive, tomato, tortellini

Croutons (For Soup or Salad)

Karney Family Recipes Posted on April 9, 2017 by Mark KarneySeptember 4, 2020

There is nothing like freshly made croutons to add the perfect finishing touch to a soup or a salad. I’ve been making these for a while and never thought much of it. I recently made them with soup for my friends Danielle and Bill. When they called me for the recipe, I knew it was time to add it to the website, so here we go. The trick is to use a good quality bread and extra-virgin olive oil.

My friend Adrienne had a good idea. When you have leftover ends of loaves or bread that is going stale, cube the bread and put it in a zip-lock bag in the freezer. After a while you’ll have a good supply of pre-cubed bread to quickly make croutons. No thawing needed! just throw them in the pan.

Croutons (For Soup or Salad)

April 9, 2017
by Mark Karney
Print this recipe

Ingredients

  • Good quality bread, a bit stale is OK
  • Extra-Virgin Olive Oil
  • Granulated garlic
  • White pepper, preferably freshly ground
  • Salt (If Desired)

Instructions

  1. Start with a good quality bread, Italian, French, Multi-Grain or any combination thereof. It's OK if the bread is a few days old and a good way to get rid of the ends of loaves. Slice the bread and dice into approximately 1 inch cubes.
  2. Heat a generous amount of olive oil,several tablespoons (Use a really good quality of oil) in a large frying pan over medium heat and throw in the bread cubes. Toss until coated with olive oil.
  3. Toast the bread for a few minutes and then sprinkle generously with granulated garlic, white pepper and a bit of salt if desired.
  4. Spray the tops of the cubes with more olive oil, and keep turning every few minutes until the cubes are browned. Adjust the heat so you don't burn the cubes. Fresh bread will take longer than stale bread.
  5. Remove from heat and enjoy! The cubes should be crisp on the outside but soft on the inside.
After you have made this a couple of times you'll figure out the amounts and how much heat to use. Really, it's pretty hard to screw up unless you aren't keeping an eye on it while it is toasting. Again, use a good quality bread (Avoid sandwich bread if possible) and your best extra-virgin olive oil.

Notes

A time and money-saving idea is when you have leftover bread ends or bread going stale, chop it into cubes and put it in a zip-lock bag in the freezer. Then all you will need to do is pour some pre-cubed bread to your frying pan and you are ready to go. You are also not wasting the ends of a loaf of bread.

Share on social

© 2023 Copyright © 2020 by Norwest Communications Inc.

Posted in All, Breads, Rolls, & Crusts, Salads, Soups | Tagged Croutons, salad, soup

Apple Bran Nut Muffins

Karney Family Recipes Posted on January 19, 2017 by Mark KarneySeptember 4, 2020

Apple Bran MuffinsThis is one of my favorites for a quick, healthy breakfast. I developed this recipe when the boys were young to try and come up with a muffin that wasn’t loaded with sugar, saturated fat and empty calories. It has reduced sugar, no trans-fat and lots of fiber and all the nutrients from apples and nuts.

As with many others, I’ve updated the recipe with Vegan options and have fun testing out these recipes on my Vegan friends. There are probably other Vegan substitutions, but this is the one I have tested.

Apple Bran Nut Muffins

January 19, 2017
by Mark Karney
Print this recipe

Ingredients

  • 1 cup flour
  • 2/3 cup sugar
  • ½ cup canola oil
  • 1 whole egg (1 Tbsp. ground chia and flax seeds & 3 Tbsp. water for Vegan)
  • ¾ cup milk (Almond milk for Vegan)
  • 1 ½ cup Kellogg's All-Bran Original cereal
  • 2 apples – sliced, peeled & chopped. Granny Smith apples are best.
  • ¾ cup walnuts or pecans (chopped)
  • 1 Tbsp. baking powder

Instructions

  1. Mix all ingredients together until well blended.
  2. Spoon into paper baking cups in a muffin tin. You'll need to heap the batter up over the top of the cups.
  3. Bake at 375° until done. (About ½ hour)

Nutrition Facts

Apple Bran Nut Muffins

Serves: 12 Muffins

Amount Per Serving:
1 Muffin
Calories Calories: 250
% Daily Value*
Total Fat 0
Saturated Fat 0
Trans Fat
Cholesterol 0
Sodium 0
Total Carbohydrate 0
Dietary Fiber 0
Sugars
Protein
Vitamin A Vitamin C
Calcium Iron

* Percent Daily Values are based on a 2,000 calorie diet. Your daily values may be higher or lower depending on your calorie needs.

Karney Family Recipes

Notes

This is a very stiff batter that seems to be mostly apples, so you will need to heap it up over the top of the cups. This is OK, it will hold it's shape and just raise up a little bit.

Share on social

© 2023 Copyright © 2020 by Norwest Communications Inc.

Posted in All, Breakfast, Cakes & Cookies, Vegan, Vegetarian | Tagged apple, bran, breakfast, muffin, vegan

Ginger-Garlic Spicy Asian Soup

Karney Family Recipes Posted on December 21, 2016 by Mark KarneySeptember 4, 2020

I created this recipe a number of years ago for Natalie when she was suffering from a bit of a cold since she is a big fan of ginger, garlic, and hot peppers. It provided some relief and we’ve been making it ever since, whether we need it for its curative properties or not. Despite the fresh vegetables, we usually eat it in the fall and winter, as it is soothing for stuffed up noses and sore throats. Of course, spicy soup is always comforting in cold weather.

This recipe can be very flexible and you can adjust the amounts to your taste and by what vegetables are available. However, the key ingredients are lots of ginger and garlic, and some type of hot pepper. Miri, Soy Sauce and Star Anise also help give the broth it’s characteristic flavor, so don’t omit or skimp on these items. You can leave the soup with just vegetables — I sometimes add shrimp but cooked pork or chicken would probably be good, or tofu to keep it vegan or vegetarian. If your head is really stuffed up, increase the amounts of ginger, garlic, and hot pepper. You have my word that you’ll feel a lot better after a hot bowl of this soup.

Ginger-Garlic Spicy Asian Soup

December 21, 2016
by Mark Karney
Print this recipe

Ingredients

  • 1 large shallot, minced
  • 3 inch piece of ginger, minced
  • 3-4 large cloves of garlic, minced
  • 1 large jalapeno pepper, finely diced, or hot pepper flakes
  • 1 bunch green onions, diced
  • 2 tablespoons sesame oil
  • 4 star-anise
  • 64 oz. broth, I use "Imagine" vegetarian "No-Chicken" broth
  • 2-3 tablespoons Aji Mirin, rice wine
  • 1-2 tablespoons Lite soy sauce
  • 6 ounce rice noodles or Ramen.
  • 10 oz. Baby Bella mushrooms, stems removed and sliced
  • 1/2 sweet red pepper, matchstick cut
  • 2 baby bok choy, sliced at about 1/4 inch, including leaves
  • 1 cup snow pea pods sliced on an angle
  • Bean sprouts (optional)
  • Pre-cooked shrimp, chicken, pork, or tofu (optional)

Instructions

  1. Dice the green onions saving the green part for garnish.
  2. Saute the ginger, garlic, shallot, pepper and white part of the onion in oil over medium heat until softened.
  3. Add the broth, turn the heat to high, and add the 4 star-anise, one-half of the Mirin, and one half of the soy sauce.
  4. Stir and taste, adding soy sauce to get the proper amount of saltiness. The amount needed will vary depending on your choice of broth. Add more Mirin if you like it sweeter.
  5. Let the broth simmer for about 10 minutes. Remove the star anise and then add the rice noodles or Ramen and all of the vegetables except the bean sprouts and green onions. Turn up the heat and bring to a low boil and cook until the noodles are done.
  6. Add the shrimp, pork, chicken, or tofu if desired and heat through.
  7. Put some bean sprouts in the bottom of each bowl and ladle the soup in.
  8. Everyone can top with green onions to their taste.

Nutrition Facts

Ginger-Garlic Spicy Asian Soup

Serves: 4 Servings

Amount Per Serving:
2 cups
Calories 318.03 kcal
% Daily Value*
Total Fat 8.15 g 12.3%
Saturated Fat 1.18 g 5%
Trans Fat 0.0 g
Cholesterol 0.0 mg 0%
Sodium 359.1 mg 15%
Total Carbohydrate 51.98 g 17%
Dietary Fiber 5.13 g 20%
Sugars 6.51 g
Protein 8.57 g
Vitamin A 8.36 % Vitamin C 67.94 %
Calcium 12.12 % Iron 17.09 %

* Percent Daily Values are based on a 2,000 calorie diet. Your daily values may be higher or lower depending on your calorie needs.

Karney Family Recipes

Notes

As stated in the description, you can vary most of the amounts and the ingredients according to your preferences. The key ingredients are lots of garlic and ginger and some type of hot pepper, so don't omit or skimp on these. Star Anise isn't essential, but it adds an exotic flavor profile. The Mirin and soy sauce give the broth it's flavor so don't omit those. I think the some type of mushroom is essential also, Shitake is good but you should probably saute those with the garlic, ginger and onions. Experiment with vegetable types and amounts. You could use carrots in place of the sweet red pepper. The protein is optional. I usually add shrimp, but any of the others or none is good.

Share on social

© 2023 Copyright © 2020 by Norwest Communications Inc.

Posted in All, Soups, Vegan, Vegetarian | Tagged garlic, ginger, soup, vegan, vegetarian

Butternut Squash Soup

Karney Family Recipes Posted on October 27, 2016 by Mark KarneySeptember 4, 2020

Butternut Squash Soup

October 27, 2016
by Mark Karney
Print this recipe

Ingredients

  • 4-5 pounds butternut squash (2 large)
  • 2 large onions
  • 2 large jalapeno peppers (optional)
  • 1 large russet potato
  • 1 pound carrots
  • 10 cups Low-Sodium Chicken Broth or Vegetable Broth
  • 3 - 4 Tbsp. fresh sage leaves (or dried sage)
  • 2 tsp. sweet Paprika
  • 1 tsp. Fresh-Ground Nutmeg
  • 1 tsp. White Pepper to taste
  • Salt (if needed)
  • 3 bunches green gnions or chives (chopped)

Instructions

  1. Peel, seed and cube the squash.
  2. Peel and cube the carrots* and the potato.
  3. Chop the onions and the peppers if you are using them.
  4. In a large pot, saute the onions and peppers in the oil until they are translucent and just start to brown.
  5. Add the squash and the potato and carrots, or the potatoes to the pot and then add the broth** until the vegetables are almost covered.
  6. Bring to a simmer and cook until the vegetables are tender, about 15-20 minutes.
  7. When the cooking is almost done, Chop the sage and add it to the pot.
  8. Use a hand blender to puree the soup.***
  9. Season with paprika, nutmeg, salt and white pepper.****
  10. Taste and add more salt and white pepper if necessary.
  11. Serve with chopped green onions or chives.
I always hate to see the warm days of summer go, but one bright spot as the cold short days of fall and winter arrive is a nice hot bowl of Butternut Squash soup and a fresh warm piece of good, hearth baked multi-grain or rye bread. This is a savory, spicy soup with just a hint of sweetness. It's relatively easy to make if you have an immersion blender and a large batch will provide meals for a couple of days along with some to freeze.
I tend to modify the recipe according to which vegetables I have on hand. To change up the recipe a bit, add a couple of large chopped jalapeno peppers and saute with the onions. My current recipe uses 1 large potato and 1 pound of carrots.

Notes

* You can substitute parsnips for the carrots or use a mixture of both. The potato adds some creaminess to the soup but you can eliminate it to reduce carbs.
** I use my favorite vegetable broth called "No Chicken", made by Imagine, which makes for a vegetarian and vegan recipe. You can substitute chicken broth or your favorite vegetable broth.
*** If you don't have a hand blender, you can remove the cooked vegetables with a slotted spoon and puree them in a blender or food processor and then return the puree to the soup pot. This is a messy and time-consuming way of doing this, so if you like the recipe, splurge and buy yourself a hand blender.
**** For this recipe I usually grate a whole nutmeg seed into the pot and also season with a considerable amount of white pepper to give the soup a bit of a bite, but add it to your own taste. I add some paprika for color. Taste before you add salt as the soup may be salty enough from the broth.

Share on social

© 2023 Copyright © 2020 by Norwest Communications Inc.

Posted in All, Soups, Vegan, Vegetables, Vegetarian | Tagged butternut squash, soup, vegan, vegetarian

Roasted Tomatillo Salsa with Avocados

Karney Family Recipes Posted on September 19, 2016 by Mark KarneySeptember 4, 2020

Since I’ve been growing Tomatillos in the garden, I’ve been looking for new recipes to use them in. I found a couple interesting recipes on the web and adapted them to my own tastes and came up with this one. Grilling the Tomatillos, onions and peppers adds a delightful smokiness to the salsa, so you really need to make an effort to grill them. I made this recipe for our annual trip to the Vintage Illinois wine festival at Mattheissen state park and it disappeared quickly even with a lot of other food around, which let me know it was a hit. This is an interesting alternative to Guacamole, and a nice change when Tomatillos are in abundance.

Roasted Tomatillo Salsa with Avocados

September 19, 2016
by Mark Karney
Print this recipe

Ingredients

  • 2 pounds tomatillos, husked and washed
  • 2 large Jalapeno peppers, quartered lengthwise, seeds and pith removed
  • 1/4 large red onion, large dice
  • 4 cloves of garlic
  • 3 or 4 ripe avocados
  • Juice of 1/2 lime
  • 2 red peppers, I use hot Hungarian
  • 1 bunch cilantro
  • Olive oil
  • Granulated garlic (to taste)
  • Pepper (to taste)
  • Salt (to taste)
  • Sugar (to taste if needed)

Instructions

  1. Halve and remove stem from the Tomatillos.
  2. Put the Tomatillos, onions and peppers in a bowl and sprinkle generously with salt, pepper, granulated garlic and olive oil, mix well to coat evenly.
  3. Grill this mixture on a very hot grill, in a grill pan until the vegetables start to brown a bit. If the grill isn't very hot the Tomatillos will turn to mush before they start to brown.*
  4. When the mixture has cooled a bit, puree it in a food processor along with the garlic and lime juice.
  5. Peel and seed the Avocados, and dice to about 1/2 inch cubes. Combine in a bowl with the Tomatillo puree. Add the chopped bunch of the cilantro to taste.
  6. Seed the red peppers and remove the pith, chop fine and add to the mixture.**
  7. Mix well, taste, and add salt as needed. You may want to add some sugar depending on the tartness of the Tomatillos.
  8. Serve with cornchips.

Nutrition Facts

Roasted Tomatillo Salsa with Avocados

Serves: 16

Amount Per Serving:
1/2 cup
Calories 119.18 kcal
% Daily Value*
Total Fat 8.83 g 12.3%
Saturated Fat 1.26 g 5%
Trans Fat 0.0 g
Cholesterol 0.0 mg 0%
Sodium 298.89 mg 12.4%
Total Carbohydrate 10.69 g 3.3%
Dietary Fiber 4.69 g 16%
Sugars 4.93 g
Protein 1.78 g
Vitamin A 4.4 % Vitamin C 38.17 %
Calcium 1.68 % Iron 4.38 %

* Percent Daily Values are based on a 2,000 calorie diet. Your daily values may be higher or lower depending on your calorie needs.

Karney Family Recipes

Notes

*You could probably roast the vegetables in a 450 degree oven, but the grilling really adds a lot of flavor, so grill them if you can.
**Usually the grilled Jalapenos don't add a lot of heat so I add hot peppers to get a bit of spice in the sauce. The red peppers also add some color and flavor to the salsa, so use sweet ones if you want the dip very mild.

Share on social

© 2023 Copyright © 2020 by Norwest Communications Inc.

Posted in All, Appetizers, Dips and Spreads, Mexican, Vegan, Vegetarian | Tagged appetizer, avocado, Mexican, salsa, tomatillo, vegan, vegetarian

Baked Zucchini Appetizer

Karney Family Recipes Posted on July 1, 2016 by Mark KarneySeptember 4, 2020

We’re always looking for Zucchini recipes. Here is a great appetizer with a fraction of the calories of breaded zucchini. Thanks to Marilyn Aliede for introducing us to this one.

Baked Zucchini Appetizer

July 1, 2016
by Mark Karney
Print this recipe

Ingredients

  • 1 or 2 Medium Zucchini
  • 1/2 cup Panko
  • 1/4 cup fresh grated Parmesan cheese
  • 1 Tbsp Extra Virgin olive oil
  • 2 tsp.Thyme
  • Paprika
  • Salt
  • Pepper
  • Olive Oil

Instructions

  1. Preheat oven to 375.
  2. Mix Panko, Cheese, Thyme and 1 Tbsp. olive oil until the mixture is an even yellow color from the oil.
  3. Slice zucchini into 1/8 inch thick pieces.
  4. Spray or brush both sides of Zucchini with olive oil.
  5. Arrange in single layer on cookie sheet.
  6. Sprinkle with paprika, salt and pepper to taste.
  7. Sprinkle Panko mixture generously on top of the Zucchini.
  8. Bake 20 - 30 minutes until golden brown.

Notes

You can mix up the Panko, Parmesan cheese, olive oil and thyme mixture in advance and keep it in the refrigerator for several weeks, using it as needed.

Share on social

© 2023 Copyright © 2020 by Norwest Communications Inc.

Posted in All, Appetizers, Vegetables, Vegetarian | Tagged appetizer, vegetarian, zucchini

Natalie’s Pasta Salad

Karney Family Recipes Posted on June 25, 2016 by Mark KarneySeptember 4, 2020

Natalie’s pasta salad  is a group favorite at summer gatherings. She gets lots of requests for it, and it keeps well in the summer heat.

Natalie’s Pasta Salad

June 25, 2016
by Mark Karney
Print this recipe

Ingredients

  • 1 pound tri-colored rotini pasta
  • ½ Bottle McCormick’s Salad Supreme (2.62 oz. bottle)
  • 1 cup (8 oz.) Kraft Viva Italian Dressing
  • 3 tomatoes (chopped) or 1 lb. grape tomatoes halved or quartered.
  • 1 large cucumber (peeled, seeded and & diced)
  • 8 green onions (chopped)
  • Fresh grated Parmesan cheese

Instructions

  1. Cook pasta to al dente and drain.
  2. Chop vegetables while the pasta is cooking.
  3. Mix all ingredients together.
  4. Top with fresh grated Parmesan cheese.
  5. Refrigerate for an hour or more to let flavors blend.

Share on social

© 2023 Copyright © 2020 by Norwest Communications Inc.

Posted in All, Pasta, Salads, Vegetables, Vegetarian | Tagged pasta, pasta salad, picnic, vegetarian

Vegetable Picnic Sandwiches

Karney Family Recipes Posted on June 22, 2016 by Mark KarneySeptember 4, 2020

The idea for this came from and old Woman’s Day Encyclopedia of Cookery that we’ve had since we were first married. As usual, it has been modifies for our taste and for ease of preparation. These are nice, light, summer sandwiches that we often take to Ravinia, an outdoor summer music theater that is known for on-the-lawn picnics. Natalie makes up the filling and we put it in the cooler. We split the bread on-site and spray it with olive oil and put in the filling, thus avoiding soggy sandwiches.

Vegetable Picnic Sandwiches

June 22, 2016
by Mark Karney
Print this recipe

Ingredients

  • 12 French rolls
  • 2 red onions diced fine
  • 2 green peppers diced fine
  • 2 cucumbers, peeled and seeded and diced fine
  • 4 large ripe tomatoes, seeded and diced fine
  • 40 pitted black or Kalamata olives, chopped (1 can, 6 oz. drained)
  • 24 anchovy fillets, chopped (1 small tin)
  • 1 3 oz. jar of capers
  • 1/3 cup chopped parsley
  • Arugula if desired
  • Mayonnaise (Smart Balance Light)

Instructions

  1. Chop all the vegetables except the arugula as directed (1/4 dice or less).
  2. Combine all the vegetables except the arugula. Mix well.
  3. Add just enough mayonnaise to moisten and continue mixing.
  4. When you are ready to serve, Split each roll almost all the way through.
  5. Spray or brush the inside of the roll with olive oil, add some arugula leaves if desired and then spoon in the filling.

Notes

You can adjust the ingredients to your taste. Substitute Anchovy Paste for the Anchovies if desired.
You probably won't need to add salt as the olives, anchovies and capers provide enough salt.
The arugula is a later addition to the recipe as I had a lot of it growing, but it really adds to the flavor.
If we are going on a picnic, we usually carry the veggie mixture separately, and assemble the rolls onsite to avoid having soggy bread.

Share on social

© 2023 Copyright © 2020 by Norwest Communications Inc.

Posted in All, Main Entrees, Picnic, Vegetables, Vegetarian | Tagged picnic, sandwich, vegetable, vegetarian

Smoked Salmon, Basil and Zucchini Appetizer

Karney Family Recipes Posted on June 20, 2016 by Mark KarneySeptember 4, 2020

Zucchini Salmon AppetizerThis is a quick, delicious, summer appetizer that I came up with. We’re always looking for new uses for zucchini. I will usually make this from the first zucchini off the vine and it celebrates the beginning of the summer bounty.

Quantities are approximate and of course it all depends on the size of your zucchini and how much salmon you have. Seasonings are of course to taste.

Smoked Salmon, Basil & Zucchini Appetizer

June 20, 2016
by Mark Karney
Print this recipe

Ingredients

  • 6 ounces smoked salmon (not lox)
  • 8 ounces whipped cream cheese
  • ½ teaspoon garlic powder
  • ½ teaspoon paprika
  • 2 medium zucchini
  • 1 ounce fresh basil, sliced into strips
  • 4 ounces roasted red peppers

Instructions

  1. Shred the salmon with a fork into a small bowl.
  2. Add enough cream cheese to make a spreadable mixture.
  3. Season with garlic powder and paprika to taste and mix well.
  4. Slice the zucchini into 1/4 inch rounds.
  5. Spread with the salmon mixture.
  6. Top with basil and 1 or two pieces of red pepper.

Nutrition Facts

Smoked Salmon, Basil & Zucchini Appetizer

Serves: 8

Amount Per Serving:
3 pieces
Calories 135.99 kcal
% Daily Value*
Total Fat 10.85 g 15.4%
Saturated Fat 5.72 g 25%
Trans Fat 0.0 g
Cholesterol 36.07 mg 12%
Sodium 250.92 mg 10.4%
Total Carbohydrate 3.94 g 1%
Dietary Fiber 0.78 g 0%
Sugars 2.79 g
Protein 6.46 g
Vitamin A 16.44 % Vitamin C 37.39 %
Calcium 4.6 % Iron 3.83 %

* Percent Daily Values are based on a 2,000 calorie diet. Your daily values may be higher or lower depending on your calorie needs.

Karney Family Recipes

Notes

You can substitute cucumber for zucchini.
You can substitute pimento for the roasted red pepper.
 

Share on social

© 2023 Copyright © 2020 by Norwest Communications Inc.

Smoked Salmon, Basil & Zucchini Appetizer

June 20, 2016
by Mark Karney
Print this recipe

Ingredients

  • 6 ounces smoked salmon (not lox)
  • 8 ounces whipped cream cheese
  • ½ teaspoon garlic powder
  • ½ teaspoon paprika
  • 2 medium zucchini
  • 1 ounce fresh basil, sliced into strips
  • 4 ounces roasted red peppers

Instructions

  1. Shred the salmon with a fork into a small bowl.
  2. Add enough cream cheese to make a spreadable mixture.
  3. Season with garlic powder and paprika to taste and mix well.
  4. Slice the zucchini into 1/4 inch rounds.
  5. Spread with the salmon mixture.
  6. Top with basil and 1 or two pieces of red pepper.

Nutrition Facts

Smoked Salmon, Basil & Zucchini Appetizer

Serves: 8

Amount Per Serving:
3 pieces
Calories 135.99 kcal
% Daily Value*
Total Fat 10.85 g 15.4%
Saturated Fat 5.72 g 25%
Trans Fat 0.0 g
Cholesterol 36.07 mg 12%
Sodium 250.92 mg 10.4%
Total Carbohydrate 3.94 g 1%
Dietary Fiber 0.78 g 0%
Sugars 2.79 g
Protein 6.46 g
Vitamin A 16.44 % Vitamin C 37.39 %
Calcium 4.6 % Iron 3.83 %

* Percent Daily Values are based on a 2,000 calorie diet. Your daily values may be higher or lower depending on your calorie needs.

Karney Family Recipes

Notes

You can substitute cucumber for zucchini.
You can substitute pimento for the roasted red pepper.
 

Share on social

© 2023 Copyright © 2020 by Norwest Communications Inc.

Posted in All, Appetizers, Seafood | Tagged appetizer, basil, salmon, zucchini

Roasted Garlic & Rosemary Hummus

Karney Family Recipes Posted on June 19, 2016 by Mark KarneySeptember 4, 2020

This recipe has been very popular to those who have tried it, so I feel compelled to add one more Hummus recipe to the website. I’m not sure that it is technically Hummus as it is made from Cannelini beans and not Garabanzo beans, but I’ll leave the arguments to the connoisseurs of correctness. The Rosemary gives this Hummus quite a different flavor than the traditional ones and we like it especially with vegetables even though it is very good with Pita bread. Another selection for my growing list of vegetarian friends.

Roasted Garlic & Rosemary Hummus

June 19, 2016
by Mark Karney
Print this recipe

Ingredients

  • 2 cans Cannelini beans
  • 12 Cloves of garlic, basically a whole head
  • 1/3 cup extra-virgin olive oil
  • 3 or 4 sprigs of fresh Rosemary
  • Juice of 1 lemon
  • Dash of Cayenne pepper to taste
  • Salt to taste

Instructions

  1. Peel the garlic cloves and cut in half.
  2. Put the olive oil and garlic in a small frying pan and cook uncovered over medium heat until the garlic starts turning golden brown. (About 5 to 7 minutes)
  3. Remove from heat and let cool.
  4. Rinse the Cannelini beans an place in food processor.
  5. Remove the Rosemary leaves from the stem and add to the food processor.
  6. Add the salt, lemon juice and Cayenne pepper.
  7. When the garlic and oil have cooled, add them to the food processor.
  8. Process until the mixture is smooth, adding a little water if it is too thick.
  9. Taste and adjust seasonings.

Nutrition Facts

Roasted Garlic & Rosemary Hummus

Serves: 16

Amount Per Serving:
2 Tablespoons
Calories 152.22 kcal
% Daily Value*
Total Fat 4.86 g 6.2%
Saturated Fat 0.73 g 0%
Trans Fat
Cholesterol 0.0 mg 0%
Sodium 101.12 mg 4.2%
Total Carbohydrate 20.6 g 6.7%
Dietary Fiber 5.17 g 20%
Sugars 0.79 g
Protein 7.7 g
Vitamin A 0.21 % Vitamin C 3.19 %
Calcium 8.54 % Iron 19.45 %

* Percent Daily Values are based on a 2,000 calorie diet. Your daily values may be higher or lower depending on your calorie needs.

Karney Family Recipes

Share on social

© 2023 Copyright © 2020 by Norwest Communications Inc.

Posted in All, Appetizers, Dips and Spreads, Vegan, Vegetarian | Tagged hummus, rosemary, vegan, vegetarian

Avocado Toast

Karney Family Recipes Posted on June 18, 2016 by Mark KarneySeptember 4, 2020

Avocado ToastI’m always looking for healthy breakfast alternatives. Most American breakfast foods are laden with fat, sugar and refined carbs, and oatmeal with fruit gets a little old after a while.

Avocado toast is a quick, healthy breakfast that uses fresh ingredients. There are a lot of variations and it’s easy to come up with your own. This is one that turned out particularly well and is easy to make. Enjoy!

Avocado Toast

June 18, 2016
by Mark Karney
Print this recipe

Ingredients

  • 1 ripe avocado
  • 1 jalapeno pepper (diced fine)
  • 3 Tbsp chopped pistachio nuts
  • Baby arugula
  • Lime juice
  • Garlic powder
  • Pepper
  • Salt
  • Good extra-virgin olive oil
  • 4 pieces good whole-grain bread

Instructions

  1. Chop the jalapeno and add to the avocado and mash with a fork.
  2. Add salt, pepper, garlic powder and fresh-squeezed lime juice to taste.
  3. Toast the bread.
  4. Spray the bread with a bit of olive oil, and top with a layer of baby arugula.
  5. Spread 1/4 of the avocado mixture mixture on each of the toasts and top with the chopped pistachios. Finish with a spritz of olive oil.

Share on social

© 2023 Copyright © 2020 by Norwest Communications Inc.

Posted in All, Breakfast, Vegan, Vegetables, Vegetarian | Tagged avocado, breakfast, pistachio, toast, vegan, vegetarian

Char’s Zucchini Pancakes

Karney Family Recipes Posted on June 18, 2016 by Mark KarneySeptember 4, 2020

About August we are looking for as many ways as possible to use up the zucchini that is overtaking the garden. Our neighbor, Charlotte Welch, came up with this recipe for zucchini pancakes. It’s the best we’ve ever found. They can be served for breakfast or brunch and even as a side for dinner. Personally, I like them with Thai Sweet Chili Sauce or red pepper jelly, but you can serve them with butter or butter and syrup.

Char’s Zucchini Pancakes

June 18, 2016
by Mark Karney
Print this recipe

Ingredients

  • 2 cups grated zucchini
  • ½ cup flour
  • ½ teaspoon salt
  • 1 teaspoon sugar
  • 1 teaspoon baking powder
  • ¼ teaspoon black pepper
  • ½ cup parmesan cheese
  • 2 tablespoon melted butter
  • 2 eggs, beaten
  • 1 large shallot or small onion (optional)

Instructions

  1. Cut zucchini in half lengthwise and scoop out seeds and soft center part. Grate it into a bowl, skin included, and then squeeze out as much water as possible. I do a handful at a time.
  2. Finely dice the shallot or onion if you choose to add it in. Fry it in a little oil until translucent.
  3. Mix all ingredients together.
  4. Cook on a griddle at medium heat.
  5. Serve plain or with your choice of topping.

Nutrition Facts

Char’s Zucchini Pancakes

Serves: 2

Amount Per Serving:
2 pancakes
Calories 411.51 kcal
% Daily Value*
Total Fat 25.82 g 38.5%
Saturated Fat 14.88 g 70%
Trans Fat 0.48 g
Cholesterol 215.77 mg 71.7%
Sodium 675.36 mg 28.1%
Total Carbohydrate 22.83 g 7.3%
Dietary Fiber 1.9 g 4%
Sugars 4.67 g
Protein 22.5 g
Vitamin A 28.38 % Vitamin C 24.66 %
Calcium 57.69 % Iron 10.71 %

* Percent Daily Values are based on a 2,000 calorie diet. Your daily values may be higher or lower depending on your calorie needs.

Karney Family Recipes

Notes

The pancakes will cook slower than a typical flour pancake.
Serve with butter, butter and syrup, Thai Sweet Chili Sauce, or Red Pepper Jelly.
The addition of the shallot or onion is my innovation, and it's good if you tend toward savory flavors.

Share on social

© 2023 Copyright © 2020 by Norwest Communications Inc.

Posted in All, Breakfast, Side Dishes, Vegetables, Vegetarian | Tagged breakfast, pancake, vegetarian, zucchini

Natalie’s Potato Salad

Karney Family Recipes Posted on June 16, 2016 by Mark KarneySeptember 4, 2020

Everybody loves Natalie’s potato salad and the boys have all wanted the recipe, but it was never written down. Finally, I had Natalie make the salad and I stopped her at each step, measuring as we went. Forcing her to add the seasonings from measuring spoons rather than shakers was not pleasant, but I finally got the recipe down for posterity. (I have also adjusted this recipe a few times as the written-down amounts weren’t quite right. Make sure you taste as you add the seasonings! Here it is — enjoy!

Natalie’s Potato Salad

June 16, 2016
by Mark Karney
Print this recipe

Ingredients

  • 2.5 lb. Red Potatoes or fingerling potatoes
  • 1 Medium Sweet Onions - Diced
  • 2 Cups Diced Celery
  • 2 tsp. Ground Thyme
  • 1/2 tsp. White Pepper
  • 1 Cups mayonnaise
  • 4 Hard Boiled Eggs, chopped fine
  • 4 Tbsp. prepared yellow mustard
  • 1 Tbsp. cider vinegar
  • Paprika
  • Salt (To taste)

Instructions

  1. Wash and dice the potatoes, removing bad spots. It's really not necessary to peel red potatoes unless you are finicky about those sort of things.
  2. Boil the potatoes until cooked. Don't overcook or you will wind up with mashed potato salad. Cool the potatoes in cold water and drain.
  3. Chop the celery and onions fine.
  4. Boil the eggs, cool and chop fine.
  5. Mix everything together, adjusting the seasoning to your taste.
  6. When you are ready to serve, top with paprika

Share on social

© 2023 Copyright © 2020 by Norwest Communications Inc.

Posted in All, Barbecue, Picnic, Side Dishes, Vegetables, Vegetarian | Tagged picnic, potato salad, vegetarian

Mom’s Nut Roll (Dios)

Karney Family Recipes Posted on December 13, 2015 by Mark KarneyJanuary 24, 2021

Helen Kun Karney, Circa 1925

Helen Kun Karney
circa 1925

My paternal Grandmother, Helen Kun Karney, immigrated to the United States at the tender age of 16, in 1901. She married my grandfather, Steven Karney in 1904; they both came from the same town in Hungary, Battyan.  Dios (‘dee-oshe) or Nut Roll is a Hungarian Christmas tradition, and I’ll never know if she carried a hand-written recipe with her on the boat from Europe, or if she created it from memory, but the recipe remains over 100 years later.

Grandma Karney’s recipe was passed on to me through my mother who used it to make the nut roll I remember so well. Although, I’m sure I watched my mother make it (and probably licked the bowl that contained the sugar and walnut filling,) I had never prepared it on my own until recently. I still use the same Wearever #918 aluminum pan that my mother used, and it perfectly holds the four rolls that that this timeless recipe makes.  I recently purchased a second pan on Ebay. They haven’t been made in a long time, but if you can find one on Ebay, it will last for many generations. Nutroll freezes well, so while you are at it, make a couple of batches.

Mom’s Nut Roll (Dios)

December 13, 2015
by Mark Karney
Print this recipe

Ingredients

Dough

  • 1 cup or 8 oz. (2 sticks) unsalted butter or margarine
  • 2 pkg. dry yeast
  • 1/4 cup warm water
  • 4 egg yolks
  • 4 to 5 cups of flour
  • 1 cup sour cream
  • 2 Tbsp sugar

Filling

  • 2 lb. ground walnuts
  • 4 egg whites
  • 1 scant cup of sugar
  • 1 tsp. vanilla

Instructions

  1. Make a leaven of 1/4 cup of warm water, 1 tsp. sugar and the yeast. Set aside.
  2. Melt the butter and mix with the sour cream, sugar, 2 cups of flour and finally the egg yolks.
  3. The mixture should be cool or only slightly warm. Now you can add the yeast mixture and knead in the rest of the flour until the mixture is about the consistency of soft bread dough.
  4. Knead until smooth. If the dough has a layered look and won't hold together, knead in a little water until the dough is smooth and cohesive.
  5. Divide into 4 parts and refrigerate covered overnight.
  6. Mix together walnuts, egg whites, sugar and vanilla to make filling.
  7. Roll out each piece of dough into a rectangle the length of your pan.
  8. Spread with 1/4 of the walnut filling.
  9. Dios 1
  10. Roll up jelly roll style.
  11. Dios 2
  12. Butter the baking pan lightly.
  13. Put the 4 rolls in a baking pan and let rise in a warm place, covered, for 2 hours.
  14. Bake at 350F for about 45 minutes.
  15. Dios 3
  16. Cool and slice.

Nutrition Facts

Mom’s Nut Roll (Dios)

Serves: 96

Amount Per Serving:
Calories 118.72 kcal
% Daily Value*
Total Fat 8.82 g 12.3%
Saturated Fat 2.14 g 10%
Trans Fat 0.08 g
Cholesterol 12.42 mg 4%
Sodium 4.22 mg 0.2%
Total Carbohydrate 8.52 g 2.7%
Dietary Fiber 0.99 g 0%
Sugars 2.69 g
Protein 2.63 g
Vitamin A 2.51 % Vitamin C 0.16 %
Calcium 1.44 % Iron 2.12 %

* Percent Daily Values are based on a 2,000 calorie diet. Your daily values may be higher or lower depending on your calorie needs.

Karney Family Recipes

Notes

If you have trouble rolling out the dough or if it tears, your dough is too dry.It's better to err on the side of too soft, rather than too dry.
I use Ceresota all-purpose flour in my recipe. Other flours may have more or less moisture, so adjust the amount for a soft, but not sticky dough.
I usually cut the rolls in half crosswise, wrap them in foil and refrigerate until needed. Then I slice the larger piece into 1/2 in slices for serving. It dries out less than if you pre-slice the whole thing.
For freezing, wrap in foil and then seal in air-tight freezer bag.

Share on social

© 2023 Copyright © 2020 by Norwest Communications Inc.

Posted in All, Cakes & Cookies, Desserts, Holidays, Hungarian | Tagged Dios, Hungarian, nut roll, walnut

Post navigation

← Older posts

Categories

  • All (96)
  • Appetizers (26)
  • Asian (5)
  • Barbecue (4)
  • Beef (2)
  • Beverages (1)
  • Breads, Rolls, & Crusts (6)
  • Breakfast (11)
  • Cakes & Cookies (9)
  • Desserts (3)
  • Dips and Spreads (13)
  • Holidays (10)
  • Hungarian (10)
  • Main Entrees (24)
  • Mexican (10)
  • Pasta (4)
  • Picnic (4)
  • Pork (2)
  • Poultry (4)
  • Rubs, Seasonings, & Marinades (4)
  • Salads (9)
  • Sauce & Condiment (11)
  • Seafood (8)
  • Side Dishes (14)
  • Snack Foods (3)
  • Soups (8)
  • Tips & Techniques (2)
  • Vegan (35)
  • Vegetables (34)
  • Vegetarian (54)

Blogroll

  • Make Ahead of Monday Make your meals ahead and enjoy a less stressful start to your week with these vegetarian/vegan recipes.
  • Mark's Garden Blog The Life and Times of A Home Gardener

Links

  • Ravinia Festival Since 1904, Ravinia Festival Association has been Chicago’s “sound of summer.”
  • The Chopping Block Chicago’s largest recreational cooking school and gourmet retail store.

Tags

aioli appetizer avocado basil beef bread breakfast cabbage condiment cookie cucumber dip dried tomato eggs hummus Hungarian kale kifli marinade Mexican Middle-Eastern mushroom nut roll Oriental pasta picnic potato potato salad quiche rosemary salad salmon salsa sandwich sauce snack soup spread tomatillo tomato turkey vegan vegetarian walnut zucchini
©2023 - Karney Family Recipes - Weaver Xtreme Theme
↑